Deploying Apigility
You've developed an API using Apigility, you've finished testing and documenting, and now you are ready to push to production. How do you deploy the API?
Since Apigility 1.1 we added in the Admin UI the "Package page" that can be used to create the package file containing the APIs ready for deployment.
The package feature of Apigility is based on the usage of ZFDeploy, a command line tool to package Zend Framework 2 application in a single file ready to be deployed.
Preparing to deploy
A couple items to consider when preparing to deploy are (a) production configuration, and (b) the landing page of your application.
Apigility builds on the Zend Framework 2 skeleton. This skeleton includes configuration for where to
find configuration files, as well as version control rules for excluding what is dubbed "local"
configuration. Essentially, ZF looks for application configuration files in the config/autoload/
tree, and has separate globs for those suffixed with global.php and those suffixed with
local.php; additionally, the latter, "local" files are omitted from version control by default.
This makes them the recommended location for environment specific configuration, and particularly
any configuration involving credentials or specific servers.
We recommend keeping your production configuration separate from the application repository. This can mean storing them in a separate, private repository -- for example, scripts that are uploaded with tools such as Chef, Puppet, or Ansible. Alternately, if you keep this information in another repository, you can also use the ZFDeploy tool, outlined below, to slurp in the production configuration when creating a deployment package.
Regarding the landing page of your application, if you use the Apigility skeleton application, the
"home page" by default redirects to the Apigility welcome page -- which is disabled when in
production mode! As such, we recommend altering your
Application\Controller\IndexController::indexAction() method to do something other than redirect,
or to redirect to another page. This will mean removing the following line:
// in module/Application/src/Application/Controller/IndexController.php:
return $this->redirect()->toRoute('zf-apigility/welcome');
and replacing it with something else; for example, to have it redirect to your end-user HTML API documentation:
return $this->redirect()->toRoute('zf-apigility/documentation');
Update the home page!
The landing page for your application will not work, and will in fact raise an error if you do not make the changes to the landing page as recommended above!
Deploy using Apigility Admin UI
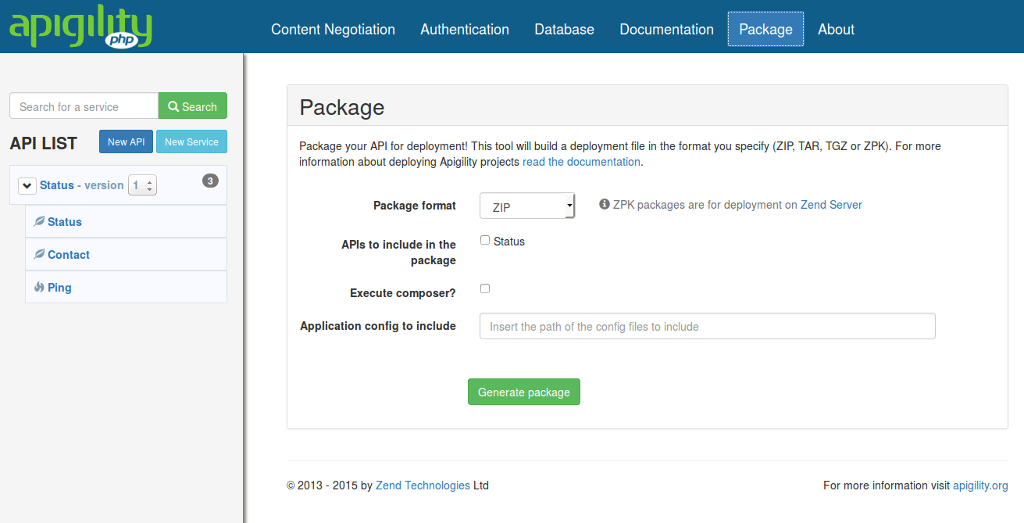
If you are using the Apigility Admin UI you can deploy your APIs in one click! Just go to the "Package" page, select the APIs to be included in the package, and click the "Generate package" button.
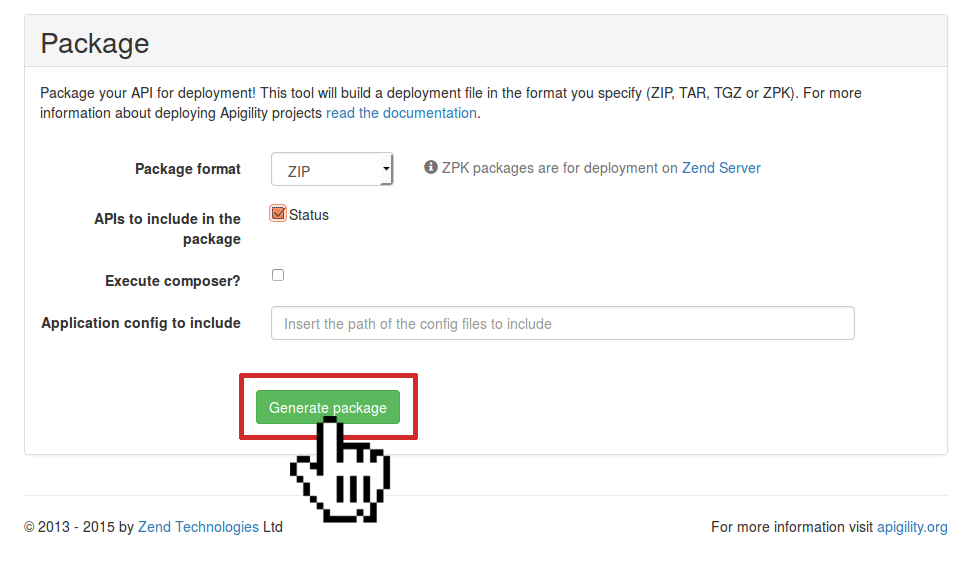
Apigility will generate a .ZIP file (default format) to be downloaded, that's it! You can deploy this file in any PHP environments, including cloud infrastructures.
Apigility supports different file format for the package: ZIP, TAR, TGZ (TAR.GZ), and ZPK, the file format used by Zend Server.
You can check the "Execute composer" option to include the composer install in the package. This option can be relevant if you want to create a package ready to be deployed as is. If you have a deploy process that already includes the composer execution, you can omit it (default value). Moreover, you can set off the execution of composer if you need to deploy an update package that does not require a composer update.
Finally, in the "Package" page you can specify the path of the configuration file to be included in the package. Usually, the configuration files of a production environment are different from a testing one, so you can use this option to manage this difference.
Manual deployment using Composer
One way to deploy an Apigility application is to use Composer to create a production package. This method requires the following 3 steps:
Composer: Step 1
Copy all the application files into a new directory, omitting the vendor/ and .git/ directories,
the composer.lock file, and all local configuration files:
$ rsync -a --exclude-from=".gitignore" --exclude=".git" /source /destination
Note the usage of the --exclude-from option to exclude all the files reported in .gitignore.
The .gitignore file specifies omitting the vendor/ directory, the composer.lock file, and all
the local configuration files such as config/development.config.php and
config/autoload/*.local.php that should not be included in a production environment.
Composer: Step 2
Execute the Composer installer in the destination folder, indicating that development dependencies
should be omitted. (If composer.phar is not included in the destination folder, you can download
it from the Composer website.)
$ php composer.phar install --no-dev --prefer-dist --optimize-autoloader
The above command also indicates that distribution packages should be used if available (which will reduce the overall size of your installation package), and to generate the production-optimized autoloader.
Composer: Step 3
After installing dependencies, you can package the entire application and deploy it. For instance, you can create a ZIP file by executing the following command inside the package folder:
$ zip -r /path/to/package.zip *
(Where /path/to is the path for the package.zip output file.)
At this point, you have a package you can deploy to production using your preferred deployment mechanism.
Notes on deployment
One of the most important parts in the previous steps is the usage of the .gitignore file to omit
development configuration files. When you deploy an Apigility application in production you must be
sure that the files are aligned with the production environment.
Here are some specific Apigility files that you must omit in production:
-
config/development.config.php: If this file is present, Apigility will be executed in "development mode," enabling the Admin UI publicly via the/apigilityURL. You can switch off development mode in Apigility using the following command from the root of your project:php public/index.php development disable. -
config/autoload/*.local.phpfiles are releated to your local environment. Usually these files are not under version control and are specific to the environment; you will likely need different settings for your production environment. (Note: As part of Step 2 above, you may want to create appropriate local configuration files for your production environment to include in the package.) -
.git/directories usually are not required in a production environment; left in place, these directories can significantly increase the size of the package.
Deploy on Zend Server
Once you have created your package.zpk file, you can deploy it using the Deploy Application
feature of Zend Server. Below is a video that introduce Zend Server features, including the
Deploy mechanism.
You can also deploy a ZPK from the commandline. To do this, download the Zend Server Web API SDK. Once you have it, you will need to:
- Create an API key in the Zend Server UI.
- Create an SDK target.
- Either deploy a new application, or update an existing one.
Create an API key
To create an API key, first navigate to the "Administration" screen, and the "Web API" panel within that screen:

Click the "Add Key" button, and follow the instructions. You will likely need to assign the key administrator permissions in order to allow deployment.
Make a note of the key name and hash, as you wll use them in the next step.
Create an SDK target
Now use the key name and hash to create an SDK target, using the SDK's addTarget command:
$ zs-client.phar addTarget --target=<target name> --zskey=<key name> --zssecret=<hash>
The <target name> is a unique name you will provide so that the SDK can later use the
configuration you provide when accessing the Zend Server API. You may also need to provide the
--zsurl option if you are deploying to a server other than http://localhost:10081, and the
--http option in order to disable peer verification if your Zend Server deployment is over SSL.
$ zs-client.phar addTarget --target=api --zskey=api --zssecret=<hash> --zsurl="https://foobar.tld:100082" --http="sslverify=0&sslverifypeer=0"
For more information on the addTarget command, run zsclient.phar addTarget --help.
Make a note of the target name, as you will use it in the next step
Deploy or update an application
If you are deploying an API for the first time, you will use the applicationDeploy method of the
SDK:
$ zs-client.phar applicationDeploy --appPackage=<package filename> --baseUrl=<url application will run under> --target <target>
where <package filename> is the ZPK you created with ZFDeploy, --baseUrl is the URI you want
to run your application under, and target is the SDk target you created in the previous step.
You will also need to provide either the --createVhost or defaultServer, depending on whether
you want a new vhost created for the application, or if you want to use the default server. Finally,
we recommend passing the --userAppName <name> flag, in order to provide a human readable name for
the application.
For more information on the applicationDeploy command, run zs-client.phar applicationDeploy --help.
If you are updating an existing application that you have already deployed, first use the
applicationGetStatus command in order to find the application identifier:
$ zs-client.phar applicationGetStatus --target <target>
Look through the results to find the application and its identifier.
Next, use the applicationUpate command:
$ zs-client.phar applicationUpdate --appId <id> --appPackage <package filename> --target <target>
where <id> is the application identifier you discovered with applicationGetStatus, <package filename> is the package you created with ZFDeploy, and <target> is the SDk target you created in the previous step.
For more information on the applicationUpdate command, run zf-client.phar applicationUpdate --help.