
OAuth2
OAuth2 is an authentication framework used worldwide. Facebook, Github, and Twitter use this protocol to authenticate their APIs. Before introducing Apigility OAuth2 functionalilty, let's briefly look at the core concepts of this authentication system:
In the OAuth2 specification (RFC 6749), we have the following definitions:
- Resource Owner: the User
- Resource Server: the API
- Authorization Server: often the same as the API server
- Client: the Third-Party Application
In Apigility, the Resource Server and the Authorization Server are delivered from the same API server.
The OAuth2 protocol is a framework for Authorization. From the abstract of RFC 6749 we can read:
The OAuth 2.0 authorization framework enables a third-party application to obtain limited access to an HTTP service, either on behalf of a resource owner by orchestrating an approval interaction between the resource owner and the HTTP service, or by allowing the third-party application to obtain access on its own behalf.
The use cases covered by the OAuth2 framework are:
- Web-server applications
- Browser-based applications
- Mobile apps
- Username and password access
- Application access
In all these use cases, the goal of the OAuth2 protocol is to exchange a token between the
Client and the Resource Server. This token is used to authenticate API calls using the
Authorization HTTP header. Below is reported an example of the Bearer token (RFC 7650),
the most used token type of OAuth2:
Authorization: Bearer RsT5OjbzRn430zqMLgV3Ia
Security considerations
The OAuth2 protocol does not guarantee confidentiality and integrity of communications. That means you must protect HTTP communications using an additional layer. The best solution is the usage of SSL/TLS (HTTPS) to encrypt the communication channel from the client to the server.
The first version of OAuth (OAuth1) supported an authentication mechanism based on the HMAC algorithm to guarantee confidentiality and integrity; OAuth2 does not. The lack of message hashing is the primary concern raised regarding the security of OAuth2, and the one most developers complain about (e.g. this blog post by Eran Hammer, the ex-lead of the OAuth specifications).
In a nutshell, always use HTTPS for OAuth2, as it's the only way to guarantee message confidentiality and integrity with this protocol!
Setup OAuth2
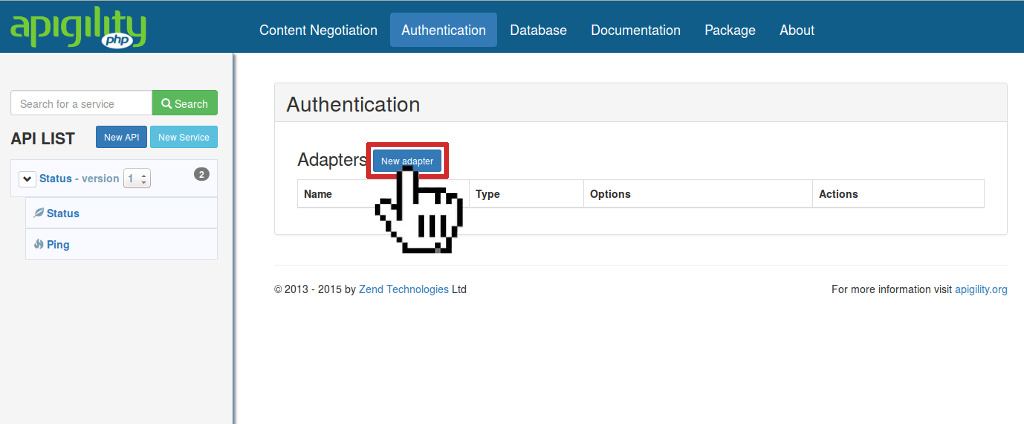
Before we jump into the different use cases for OAuth2 authentication, we need to configure an authentication adapter for Apigility. Go to the Authentication page and click on the "New adapter" button:
Choose which adapter to use for the OAuth2 dataset. You can manage the dataset using a relational database (the OAuth2 library Apigility utilizes uses PDO specifically) or MongoDB. Other adapters are available such as zf-oauth2-doctrine.
When you select the OAuth2 PDO adapter, you will see the following form:
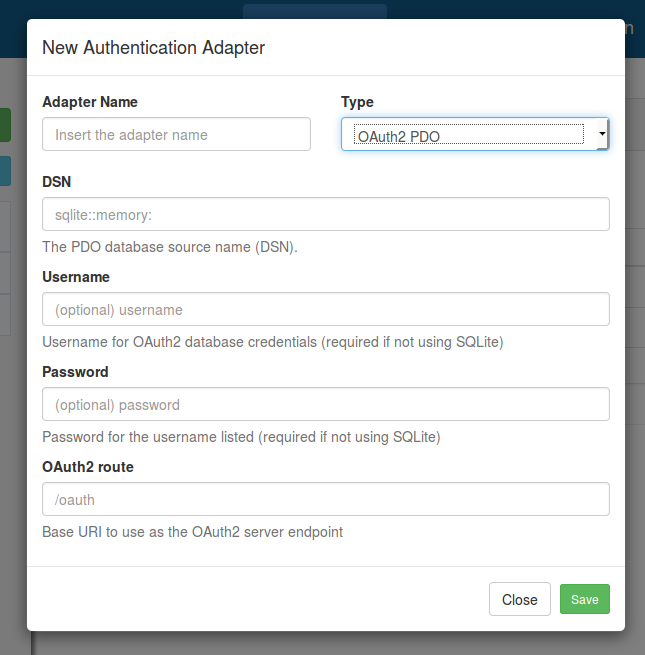
In this form, you need to insert the appropriate configuration to access the OAuth2 database, as
well as the URI path to use for authentication (the default is /oauth).
The OAuth2 database schema for PDO is in the zf-oauth2 repository.
OAuth2 implementation
Apigility uses the oauth2-server-php library by Brent Shaffer to manage the OAuth2 authentication framework.
For testing purposes, you can use the SQLite database shipped
in the zf-oauth2 repository in the file
dbtest.sqlite; copy this to data/oauth2-test.sqlite in your application to use this example database.
To use this example, you need to specify the absolute path of the database file in the PDO DSN
field, using the syntax sqlite:/path/to/database/file. In this database we created a client with
client_id testclient and client_secret testpass, and a user with username testuser
and a password testpass. We will use this data in the following use cases:
All sensitive data such as client_secret (in the oauth_clients table) and password (in the
oauth_users table), are hashed by Apigility using the
bcrypt algorithm. If you want to generate the bcrypt value of
a plaintext password, you can use the
Zend\Crypt\Password\Bcrypt
component of Zend Framework. Also included is a tool to generate bcrypt hash values from the
command line; this tool is located
in the zf-oauth2 repository
For instance, to
generate the bcrypt value of the string "test", you can use the following command:
$ php vendor/zfcampus/zf-oauth2/bin/bcrypt.php test
You will see output like the following:
$2y$10$8gHQy/sn0vB8H5wbAbhUi.tbUfpf6aE7PBllKHeKaCYTqEyd7vjo6
Note that the output of the bcrypt algorithm is a string of 60 bytes.
Web-server Applications (Authorization Code Grant Type)
The Web-server applications scenario is used to authenticate a web application with a third-party service (e.g., imagine you built a web application that needs to consume the API of Facebook). You can authenticate your application using the third-party server with a 3-step flow as illustrated in this diagram:
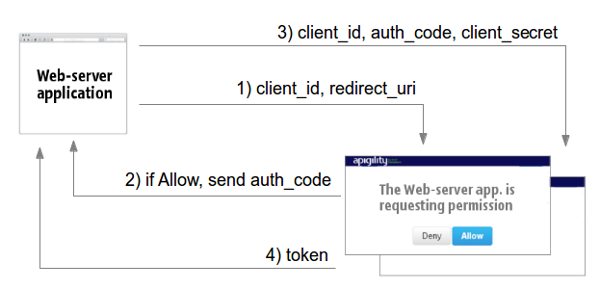
The web application sends a request (including the client_id and the redirect_uri) to the
third-party service asking for an Authorization code (1).
The third-party server shows an Allow/Deny page to the end-user requesting authorization for access.
If the user clicks on "Allow", the server sends the Authorization Code to the web application using
the redirect_uri (2). The web application can now perform a token request, passing the
client_id, the redirect_uri, and the client_secret to prove that it is authorized to perform
this request (3). The third-party server sends the token as response if the request is valid (4).
Using Apigility, we can request an access code using the following 3 steps:
1) Request the authorization code
Using a browser you can request the authorization approval from this page:
http://<apigility URL>/oauth/authorize?response_type=code&client_id=testclient&redirect_uri=/oauth/receivecode&state=xyz
Note: The above assumes you specified
/oauthas the URI path for the Apigility OAuth2 server. If you specified a different URI when you configured OAuth2, use that instead.
<apigility URL>in the above example is the domain where you installed Apigility (if you are using the internal PHP web server, this can be something likelocalhost:8888). Remember, in production, you should always use SSL/TLS (HTTPS) to secure your API when using OAuth2.
Going to this URL, you will see a web page like the following:
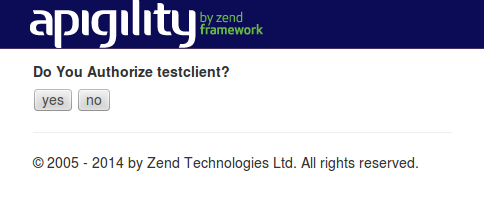
This web page is stored in the view script vendor/zfcampus/zf-oauth2/view/zf/auth/authorize.phtml
in the zf-oauth2 repository.
If desired, you can customize the view script by overriding it.
Customize the authorize page
To override the view template
oauth/authorize, update thetemplate_mapvalue of theview_managerconfiguration in theconfig.module.phpof a Zend Framework module you have defined in your application as follows:'view_manager' => [ 'template_map' => [ 'oauth/authorize' => __DIR__ . '/../view/oauth/authorize.phtml', ], ],
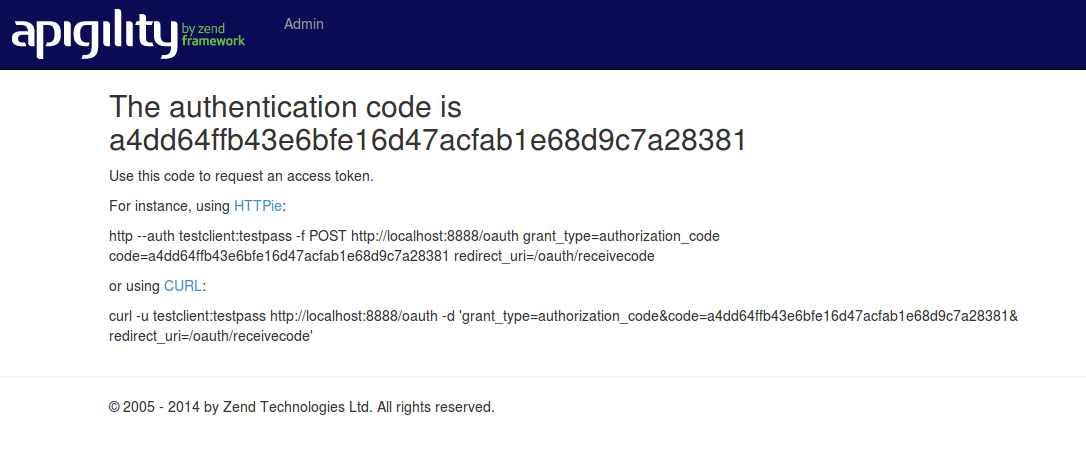
2) Approve the authorization access
If you approve the authorization access by clicking the "Yes" button, Apigility will redirect you to
the URI specified in the redirect_uri query string parameter, passing the authorization code in
the query string. In our example we will be redirected to the page /oauth/receive as shown
below:
This web page is stored in the view script vendor/zfcampus/zf-oauth2/view/zf/auth/receive-code.phtml
in the zf-oauth2 repository.
Like the authorization page, this view script can be customized.
Customize the receive code page
The best way to customize the "receive code" page is to override the view template
oauth/receive-codeby updating thetemplate_mapvalue of theview_managerconfiguration in theconfig.module.phpof a Zend Framework module you have defined in your application:'view_manager' => [ 'template_map' => [ 'oauth/receive-code' => __DIR__ . '/../view/oauth/receive-code.phtml', ], ],
3) Request the Bearer token
Now that we have the authorization code, we can request the access token by sending this code to
the /oauth URI, passing the client_id, the client_secret, and the redirect_uri as shown
below:
POST /oauth HTTP/1.1
Accept: application/json
Content-Type: application/json

{
    "redirect_uri": "/oauth/receivecode",
    "client_id": "testclient",
    "client_secret": "testpass",
    "code": "a4dd64ffb43e6bfe16d47acfab1e68d9c7a28381",
    "grant_type" : "authorization_code"
}
The OAuth2 server will reply with the token using a JSON structure like that:
HTTP/1.1 200 OK
Content-Type: application/json

{
    "access_token": "907c762e069589c2cd2a229cdae7b8778caa9f07",
    "expires_in": 3600,
    "refresh_token": "43018382188f462f6b0e5784dd44c36f476ccce6",
    "scope": null,
    "token_type": "Bearer"
}
You have 30 seconds to request the access token starting from the time that you get the authorization code.
Finally, you can access the API using the Bearer token in the Authorization header of the HTTP
request. For instance, we provided a test resource in the
zf-oauth2 module, via the /oauth/resource URI. The
following request demonstrates sending the token:
GET /oauth/resource HTTP/1.1
Accept: application/json
Authorization: Bearer 907c762e069589c2cd2a229cdae7b8778caa9f07
Browser-based Applications (Implicit Grant Type)
This scenario is quite common when using a Javascript client (e.g., a Single Page Application) that
requests access to the API of a third-party server. In a browser-based application, you cannot
store the client_secret in a secure way, which means you cannot use the previous workflow
(web-server application). Instead, we need to use an implicit grant. This is similar to the
authorization code, but rather than an authorization code being returned from the authorization
request, a token is returned.
In the following diagram, we illustrate the 2 steps needed for the authentication of browser-based application scenarios:

The browser-based application requests the authorization page of a third-party service (Step 1).
This page contains the Allow/Deny buttons used to authorize API access to the application. If the
user clicks on the "Allow" button, the third-party server sends the access token using the URI
fragment identifier (#access_token in Step 2).
The usage of the fragment identifier for the access_token is important from a security point of
view, because the token is not passed to the server; the token can be accessed only by the client
(browser).
The browser-based application scenario is supported by Apigility using the implicit grant type.
This grant type is disabled by default and you need to enable it manually, changing the
configuration of allow_implicit to true in the config/autoload/local.php file:
return [
    'zf-oauth2' => [
        'allow_implicit' => true,
    ],
];
After this change, we can request the access token using the browser-based application 2 steps:
1) Request the authorization token
We need to request the same URL used in step 1 of the web-server application scenario,
/oauth/authorize:
http://<apigility URL>/oauth/authorize?response_type=token&client_id=testclient&redirect_uri=/oauth/receivecode&state=xyz
Note: The above assumes you specified
/oauthas the URI path for the Apigility OAuth2 server. If you specified a different URI when you configured OAuth2, use that instead.
<apigility URL>in the above example is the domain where you installed Apigility (if you are using the internal PHP web server, this can be something likelocalhost:8888). Remember, in production, you should always use SSL/TLS (HTTPS) to secure your API when using OAuth2.
We will see the same web page as shown in the Web-server application scenario asking for authorization approval.
2) Approve authorization access
If we approve authorization access, by clicking on "Yes", Apigility will send the access token to
the redirect_uri using a URI fragment identifier (#access_token).
In our example, we redirect the access token to the /oauth/receive page, reported below:

If you click on the "Click here to read…" link, you will see the access token appear on the page.
This action is performed by javascript code that parses the URL to extract the access_token
value. An example of this javascript code is shown below:
// function to parse fragment parameters
var parseQueryString = function(queryString) {
    var params = {}, queries, temp, i, l;

    // Split into key/value pairs
    queries = queryString.split("&");

    // Convert the array of strings into an object
    for ( i = 0, l = queries.length; i < l; i++ ) {
        temp = queries[i].split('=');
        params[temp[0]] = temp[1];
    }

    return params;
};

// get token params from URL fragment
var tokenParams = parseQueryString(window.location.hash.substr(1));
Mobile apps (Implicit Grant Type)
This OAuth2 scenario is similar to browser-based applications. The only difference is the
redirect_uri, which, in the mobile world, can be a custom URI scheme. This allow native mobile
apps to interact with a web browser application, opening a URL from a native app and going back to
the app with a custom URI. For example, iPhone apps can register a custom URI protocol such as
facebook://. On Android, apps can register URL matching patterns which will launch the native app
if a URL matching the pattern is visited.
Below illustrates OAuth2 authentication with Mobile apps:
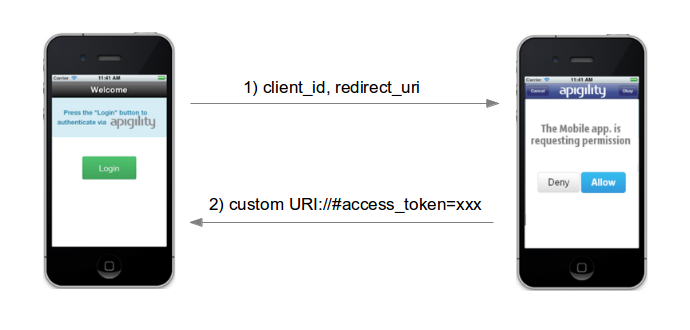
As you can see, the flow is a 2 step authentication mechanism similar to browser-based applications.
Username and password access (Password Grant Type)
This use case can be used to authenticate an API with user based grants. The typical scenario includes a Login web page with username and password that is used to authenticate against a first-party API. Password grant is only appropriate for trusted clients. If you build your own website as a client of your API, then this is a great way to handle logging in.
The authentication mechanism is just 1 step (see diagram below).
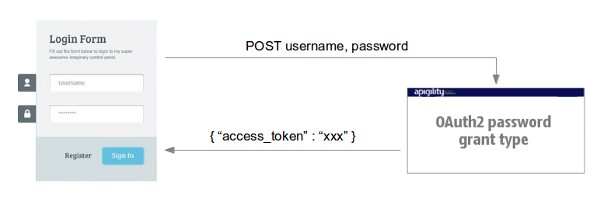
The client application sends a POST to the OAuth2 server with the username and password values.
The OAuth2 server responds with the token access as part of a JSON payload.
You can use the password grant in two ways: with confidential (trusted) clients, or public clients.
Confidential clients
With confidential, trusted clients,
you provide the client_id and client_secret as HTTP Basic authentication credentials, and the
username, and password values in the request body, in order to obtain an access token.
POST /oauth HTTP/1.1
Accept: application/json
Authorization: Basic dGVzdGNsaWVudDp0ZXN0cGFzcw==
Content-Type: application/json

{
    "grant_type": "password",
    "username": "testuser",
    "password": "testpass"
}
Note: The
Authorizationheader above is the HTTP Basic authentication credentials for theclient_id"testclient" and theclient_secret"testpass".
Public Clients
If we are using a public client (by default, this is true when no secret is associated with the
client) you can omit the client_secret value; additionally, you will now pass the client_id in
the request body. In our example database the testclient2 client_id has an empty
client_secret.
POST /oauth HTTP/1.1
Accept: application/json
Content-Type: application/json

{
    "grant_type": "password",
    "username": "testuser",
    "password": "testpass",
    "client_id": "testclient2"
}
Application access
This use case can be used to authenticate against applications, mosty likely in machine to machine
scenarios. The OAuth2 grant type for this use case is called client_credentials. The usage is
similar to the public client password access reported above; the application sends a POST request
to the OAuth2 server, passing both the client_id and the client_secret in the body. The server
replies with the token if the client credentials are valid.
Refresh OAuth2 token
The OAuth2 protocol gives you the possibility to refresh the access token, generating a new one
with a new lifetime. This action can be performed using the refresh_token that the OAuth2
server provides in the response during the authentication step.
In Apigility, you can refresh the access token with a POST to the OAuth2 server endpoint.
Using the example SQLite database, we can refresh the token using the following command:
POST /oauth HTTP/1.1
Accept: application/json
Content-Type: application/json

{
    "grant_type": "refresh_token",
    "refresh_token": "<the refresh_token>",
    "client_id": "testclient",
    "client_secret": "testpass"
}
The response will be something like:
HTTP/1.1 200 OK
Content-Type: application/json

{
    "access_token": "470d9f3c6b0371ff2a88d0c554cbee9cad495e8d",
    "expires_in": 3600,
    "scope": null,
    "token_type": "Bearer"
}
You can also refresh a token from a trusted client, specifying only the client_id and
the refresh_token fields.
If you want to generate a new refresh_token value, you need to enable the
always_issue_new_refresh_token zf-oauth2 configuration option, setting it to
true (the default is false).
return [
    'zf-oauth2' => [
        'options' => [
            'always_issue_new_refresh_token' => true,
        ],
    ],
];
You can also change the lifetime of the new refresh token using the refresh_token_lifetime
option. The value is expressed in seconds (default is 1209600, equal to 14 days).
Revoke OAuth2 token
Recently, the IETF published RFC 7009, detailing
OAuth2 token revocation. Apigility doesn't yet support token
revocation. However, it is still possible to revoke specific access tokens by removing the value from
the database. For instance, if you are using the PDO adapter, all the tokens are stored in
the oauth_access_tokens table; if you want to revoke a token you can delete it from the table,
with a SQL query:
DELETE FROM oauth_access_tokens WHERE access_token="<token to remove>";
Apache2 FastCGI
If you are using Apache2 with FastCGI to pass traffic in using PHP-FPM, you may experience an unexpected 403 error for any methods that have the Authorization box ticked.
This is because Apache2 strips the Authentication header by default when
FastCGI is enabled.
In order to pass in the Authentication header to PHP, add the following
directive to your virtual host configuration:
SetEnvIf Authorization "(.*)" HTTP_AUTHORIZATION=$1
Multiple grant types
For OAuth2 adapters that support grant types, most will allow you to add
multiple grant_type's to a client by providing them as space-separated values.
Always consult the documentation for a given adapter to verify the format.